GitHub 101 - Unleashing Your Coding Potential
September 1, 2023
You’ve probably heard of GitHub, the world’s largest platform for hosting and working on code. Millions of developers, from hobbyists to experts, utilize GitHub to share projects, learn from others, and contribute to open-source software. But what is GitHub, and how can it help you enhance your coding skills?
GitHub is a web-based tool that allows you to save your code in online repositories, which function similarly to project folders. You can make your own repositories or fork (clone) those of other users. You can also use GitHub to keep track of code changes, interact with other developers, and interface with numerous tools and services.
In this post, we’ll walk you through the fundamentals of GitHub, including how to register an account, build your first repository, make changes to your code, collaborate on projects, and more. By the end of this tutorial, you’ll have a strong understanding of GitHub and be ready to unleash your coding potential. Let’s get this party started!
Understanding GitHub
GitHub is more than simply a website; it is a platform that connects developers together to collaborate on code. GitHub is primarily a Git repository hosting service, but it also offers many other services for each project, like issue tracking, feature requests, task management, and wikis.
It All Starts With Git
Understanding GitHub begins with a grasp of Git. Git is an open-source distributed version control system that enables multiple individuals to work on a project concurrently without overwriting each other’s changes. It keeps track of any modifications made to the code in a repository, letting you to go back and find out what changed, who changed it, and why.
Repos - Not The Repo Man
All code on GitHub is stored in repositories (or’repos’ for short). A repository is similar to a folder for your project that holds all of the project’s files and records the revision history for each file. Repositories may also have numerous collaborators and be public or private.
Branches - Like a Tree
Branches are an essential component of the GitHub workflow. They indicate distinct development paths within a repository. You can build a separate branch to work on updates or new features instead of committing your changes immediately to the main branch. When your changes are complete, submit a pull request to merge your branch into the main branch.

Commits - Don’t Be Afraid of Commitment
On GitHub, commits are the lifeblood of a project. Each commit is like a snapshot of your work that you can go back to whenever you want. When you commit changes, include a commit statement that explains what was modified and why. This not only creates a clear project history, but it also assists other contributors in understanding your thought process.
Pull Requests - Time to Start Pulling Your Weight Around Here
Pull requests are requests for your branch to be merged with another branch. Pull requests can be used to examine, discuss, and approve code changes before they are committed to the main branch. Pull requests also trigger automated tests and checks to guarantee that your code is of high quality.
Issues - Do You Need a Tissue for Your Issue?
Issues are issues or ideas about your code project. Issues can be used to report defects, request features, ask questions, and provide feedback. You may also assign issues to yourself or other collaborators, apply labels and milestones, and associate them with pull requests or changes.
Wikis - Say It With Me: Wiki Wiki Wiki Wiki
Wikis are web pages that serve as documentation for your programming project. Wikis can be used to provide information, instructions, examples, and resources for your project. Anyone with access to your repository can modify your wiki.
GitHub Pages - Your Chance to Shine
GitHub Pages are online websites that host your coding project. GitHub Pages can be used to promote your work, build a portfolio, or post a blog. GitHub Pages are free to use and simple to set up in Markdown or HTML.
Setting Up Your GitHub Account
Setting up an account is the first step in getting started with GitHub. Go to the GitHub website and press the ‘Sign Up’ button. You must enter a username, email address, and password. You’ll also need to go through a brief security check to ensure you’re not a robot.
-
Open a browser and navigate to github.com, or simply click on this link

-
Click on the “Sign Up” button

-
Enter your details (username, email address, password)
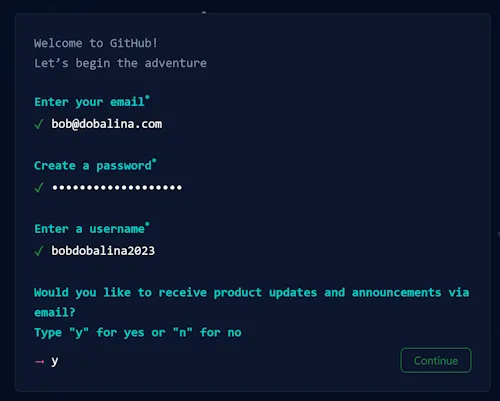
-
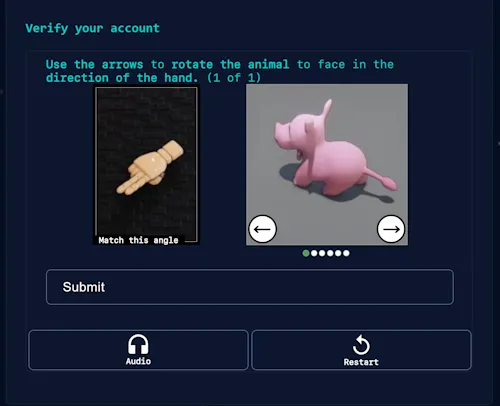
You’ll need to complete a verification that you are human
-
Click Create Account

Tips on setting up a strong profile.
A solid GitHub profile, particularly for developers, can be a valuable asset. It can assist you in displaying your work, contributing to open-source projects, and possibly landing your ideal job. Here are some pointers for creating a powerful GitHub profile.
1. Select a Professional Username
One of the first things people notice about your GitHub profile is your username. Choose a username that is professional and accurately portrays you. Your whole name, initials, or a mix of your name and profession could all be used.
2. Include a Clear Profile Image
A clear and professional profile image might help to personalize and relate your GitHub profile. It does not have to be a headshot; it could be any image that reflects you and your company and your work.
3. Create an Eye-Catching Bio
Your bio is an excellent spot to tell others a little bit about yourself, your abilities, and what you’re currently working on. Keep it brief, but don’t be hesitant to express yourself.
4. Include your location as well as your website
By providing your location, you can connect with local developers and possibilities. Include your personal website or portfolio in your GitHub profile to provide more context about your work and experiences.
5. Highlight Your Best Repositories
You can pin up to six repositories to your profile on GitHub. Use this section to highlight your greatest and most relevant work. Make sure these repositories have clear README files and are well-documented.
6. Participate in Open Source Projects
Contributing to open-source projects can display your coding abilities as well as your ability to collaborate. It also demonstrates that you are involved in the developer community.
7. Maintain a high level of activity
A high level of activity indicates that you are frequently working on projects. Even if it’s simply tiny updates or changes, try to commit code on a frequent basis.
8. Follow Users and Projects of Interest
Following other users and projects might assist you in staying current with the newest trends and innovations in your industry. It also demonstrates your involvement with the GitHub community.
It takes time and work to build a great GitHub profile, but it is well worth it. A well-crafted GitHub profile may highlight your technical skills, exhibit your coding passion, and help you stand out in the developer community.
Creating Your First Repository
Adding a new repository to GitHub is a simple process. Here’s a step-by-step procedure:
Step 1: Log in to your GitHub account.
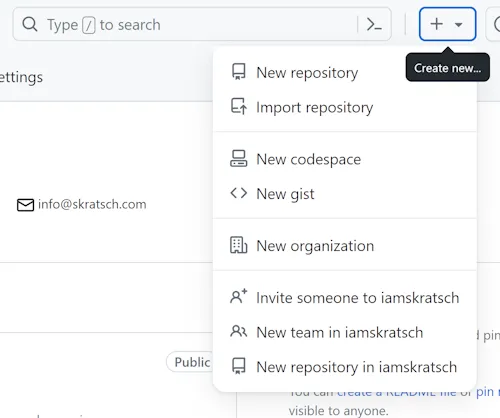
Step 2: Click on the ‘+’ icon at the top right corner of the GitHub homepage, then select ‘New repository’.
Step 3: You’ll be directed to a new page where you can set up your repository. Start by giving your repository a name. It should be short and memorable.
Step 4: Write a brief description of your repository in the ‘Description’ box. This will help others understand what your project is about.
Step 5: Choose whether to make your repository public or private. Public repositories are visible to everyone, while private repositories are only visible to you and people you choose.
Step 6: Optionally (but recommended), you can choose to initialize your repository with a README file by checking the box next to ‘Initialize this repository with a README’. More on README files here
Step 6b: Optionally, if you are going to be developing in a tool such as Visual Studio or VS Code, you may want to have GitHub generate an appropriate .gitignore file to tell Git what to ignore when tracking changes to your code. More about ignoring files here
Step 6c: Optionally, you can choose a license to apply to this particular repo. You can do this later, and you can also change the license if you change your mind later. More about licenses here
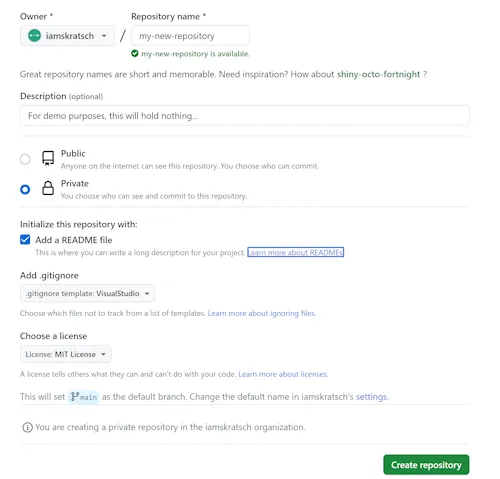
Step 7: Click on ‘Create repository’ to finish the process.

Let’s now talk about README files and their significance.
A README file is essentially project documentation. It explains why your project is useful, what people can accomplish with it, and how they can use it. A well-written README file can improve the appearance and usability of your product.
Here’s what you should put in your README:
- Project Title: The name of your project. - Description: A brief explanation of what your project performs.
- Installation Instructions: Step-by-step instructions for installing and configuring your project.
- Usage Instructions: Step-by-step instructions for using your project after installation.
- Contributing Guidelines: If you want others to contribute to your project, give them instructions on how to do so.
- License Information: If applicable, include information about the license under which your project is released.
Remember that a decent README file can significantly influence how others see and interact with your project. So put forth the effort to make it educational and simple to grasp!
Making Changes: Branches and Commits
All code on GitHub is stored in repositories. But it is GitHub’s capability for version control — the ability to track changes to code and facilitate collaboration — that makes it so powerful. Branches and commits come into play here.
Branches
Branches enable you to work on many versions of a repository at the same time. Your repository has one branch named main by default, which is considered the definitive branch. We use branches to experiment and make changes before committing them to the main repository.
Creating Branches: A Step-by-Step Guide
-
Go to your new repository.
-
Click the drop down at the top of the file list that says
branch: main.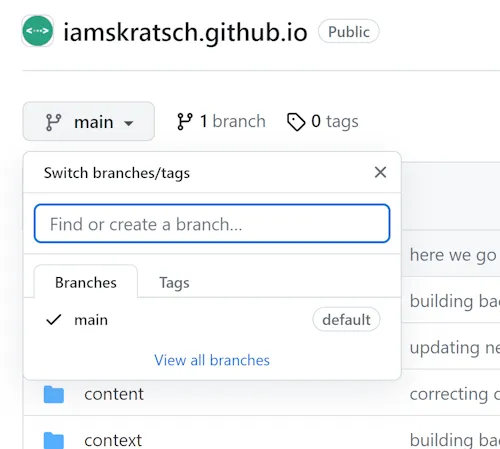
-
Type a branch name into the new branch text box.
-
Select the blue Create branch box or hit “Enter” on your keyboard.
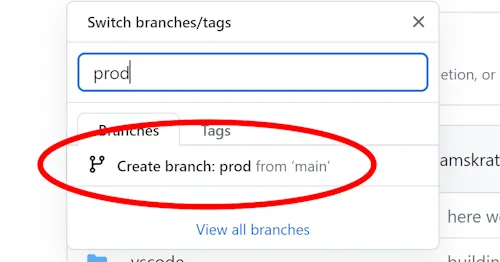
You now have two identical branches, but only for a short time! Next, we’ll show you how to make changes to your new branch.
Commits
A commit (or “revision”) is a single change to a file (or set of files). When you commit your work, GitHub generates a unique ID (a “SHA” or “hash”) that allows you to track which modifications were made when and by whom. Commits typically include a commit message, which is a concise summary of the changes done.
Creating Commits: A Step-by-Step Guide
-
Navigate to the repository on GitHub.
-
Browse to the file you want to change.
-
Click the pencil icon in the upper right corner of the file view to edit.
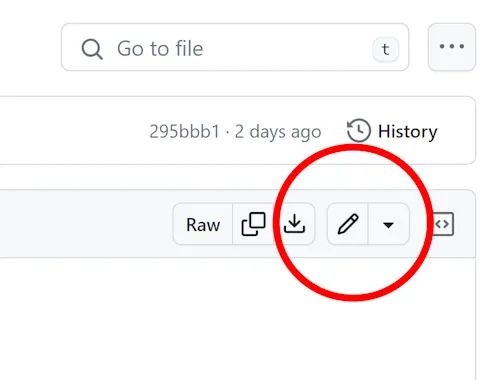
-
Make your changes to the file.
-
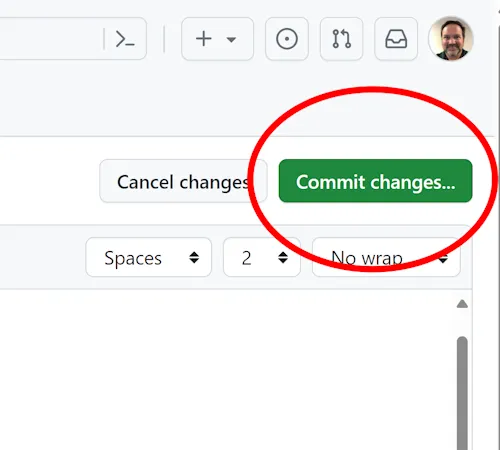
Scroll down and describe your changes in the “Commit changes” box.
-
Click “Commit changes”.
Importance of Commit Messages
Commit messages are critical because they give a record of the changes made as well as context for other developers and your future self. Good commit messages can help you uncover issues and understand why you made particular code decisions in the past.
Commit Message Best Practices
- Keep them brief but informative: A decent commit message should be able to finish the following sentence: “If applied, this commit will…”
- Use the present tense: For example, instead of “Added feature” or “Adds feature,” use “Add feature.”
- Include the why, not simply the what: While knowing what modifications were made is essential, knowing why they were made is much more so.
Remember, good commits and well-managed branches will make it much easier for others (and you) to understand what’s happening with your project and why.
Collaborating on Projects
Collaboration is vital to GitHub; it’s in the platform’s DNA. GitHub provides various tools to help coders collaborate, making it easy to contribute to projects while maintaining a high degree of code quality. Pull Requests and Forks are two of the most significant tools in this regard.
Pull Requests
Pull Requests are an important feature of GitHub that you can use to add code to another user’s repository. After forking and cloning the repository, you can make code modifications and submit them as a Pull Request.
Here’s how you can create a Pull Request:
-
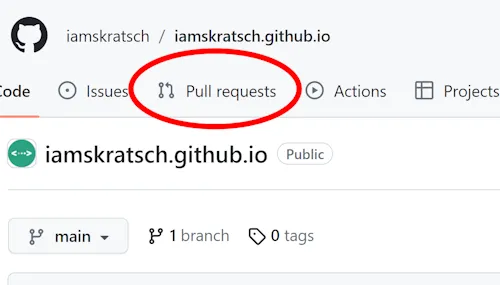
Navigate to the original repository you created your fork from.
-
Click on the Pull request button at the top of the repository.
-
Click on the New Pull Request button
-
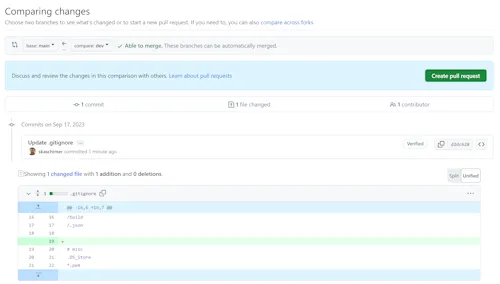
Click the dropdown button labelled base and select the branch of the original repository you’d like to pull changes into.
-
Click the dropdown button labelled compare:, and select the branch on your repository with the changes you’d like to submit.
-
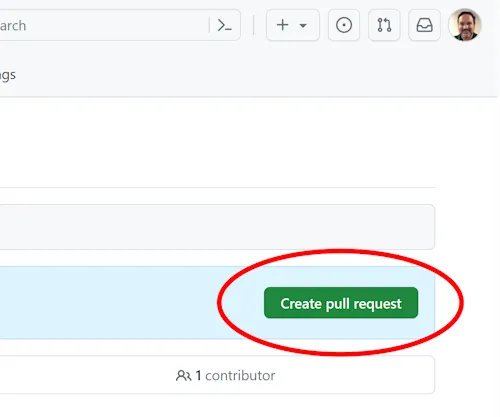
Click Create pull request.
-
Fill in the details of your pull request, and click Create pull request again.
Forks
A fork is a duplicate of a repository that is stored in your account rather than the account from which it was forked. It separates your modifications from the original project, allowing you to experiment without harming the original.
Here’s how you can create a Fork:
-
Navigate to the repository you want to fork.
-
Click on the Fork button at the top right of the repository.
-
Select your GitHub account as the location for the fork.
-
Once you’ve created a fork, you can make changes to it without affecting the original repository. If you want to propose your changes to be merged into the original repository, you can create a pull request.


Collaborating on projects is an important component of using GitHub, and knowing how to utilize Pull Requests and Forks successfully is essential for contributing to open-source projects or collaborating on private projects. You may become a more effective and productive developer by understanding these tools.
Navigating the GitHub Interface
The GitHub interface is designed for simplicity and ease of use, making it accessible to both novice and expert coders. This section will walk you through some of its most important features.
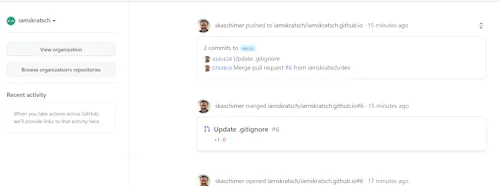
The Home Page
You’ll be directed to your dashboard when you first log in. You’ll find a feed of recent activity from repositories you’re following or contributing to, as well as recommendations for popular repositories, in this section.
A sidebar on the left side of your dashboard has links to your profile, repositories, teams, organizations, and settings.
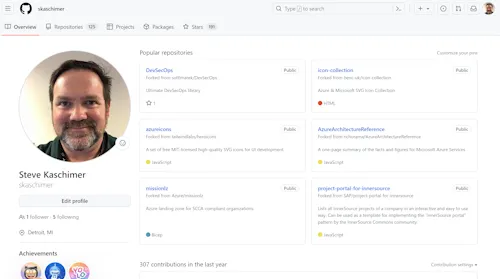
Your Profile Page
You can access your profile page by clicking on your profile photo in the top right corner. You’ll find a list of your public contributions, repositories, followers, following, and starred repositories here.
You can change your profile by clicking the ‘change profile’ option, which is located beneath your profile image.
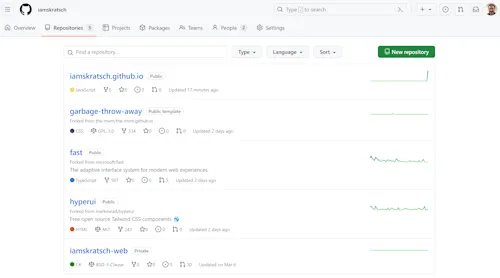
Repositories
When you click on ‘Repositories’ from your dashboard sidebar or profile page, you will be taken to a list of all your repositories. You can arrange them alphabetically, recently updated, or by stars.
To add a new repository, click the ‘New’ button next to the ‘Repositories’ header.
While this part covers some fundamental features of browsing the GitHub interface, there is still much more to discover! As with any new tool or platform, don’t be hesitant to go around and explore - there are lots more functions just waiting to be discovered.
Leveraging GitHub for Career Growth
In today’s digital age, where software development has become more collaborative and open-source software has taken center stage, having a strong presence on platforms such as GitHub has become critical for professional advancement in tech-related industries. Here are some ways that using GitHub can help you advance in your career:
Showcase Your Work
GitHub is a wonderful tool for displaying your work to prospective employers. By submitting your code to GitHub, you not only keep a backup of your work, but you also let others to see what you’re capable of. This is especially helpful when searching for employment or collaborating with other developers.
Contribute to Open Source Projects
Contributing to open-source projects on GitHub can help you advance your career dramatically. It gives you the opportunity to work on real-world projects, which can help you get practical experience and enhance your coding skills. Furthermore, it demonstrates to potential employers that you are proactive, love problem-solving, and can operate as part of a team.
Collaboration and Networking
GitHub is more than simply a code repository; it’s also a developer social network. You can learn a lot and create relationships in the developer community by following users, contributing to their projects, or simply studying their code. These contacts may lead to partnerships, job opportunities, or simply assisting you in your development career.
Continuous Learning
Technology is constantly growing, and GitHub is a terrific location to stay up to date on the latest trends and innovations. You can stay ahead in your career by examining popular repositories and following notable developers.
Personal Brand Development
Finally, GitHub allows you to construct your personal developer brand. You can establish yourself as an expert in your industry by constantly working on interesting projects, contributing to open-source software, and communicating with other users.
GitHub is more than just a version control tool; it’s a platform that can open doors to new opportunities and accelerate your professional development. So, start using GitHub immediately and propel your profession to new heights.
Common Mistakes and How to Avoid Them
While GitHub is an extremely strong software project management tool, it is also sophisticated and nuanced. Here are some of the most typical GitHub mistakes and how to avoid them:
1. Not Using Version Control
One of the most common mistakes beginners make is failing to use version control from the beginning of their projects. Version control is vital for tracking changes, understanding what each change accomplishes, and, if necessary, undoing changes.
How to Avoid: When starting a new project, always create a Git repository. Make atomic commits on a regular basis, with clear messages indicating what each commit does.
2. Poor Commit Messages
Commit messages are essential for knowing a project’s history. When commit messages are vague or confusing, it might be difficult for others (and future you) to understand why certain changes were done.
How to Avoid: In your commit messages, be precise and descriptive. Explain what you did and why, as if you were telling someone else.
3. Not Using Branches
Branches are an important feature of GitHub because they allow you to work on separate features or fixes without affecting the main core.
How to Avoid: Create a branch for each new feature or bug fix. This organizes your code and makes it easy to track changes and detect errors.
4. Overlooking Documentation
Well-documented code is easier to comprehend and use. Neglecting documentation can lead to code confusion and misuse.
How to Avoid: Always keep track of your code. To explain what your code does, how to use it, and any dependencies or prerequisites, utilize README files, comments, and wikis.
5. Ignoring Community Guidelines
Every open-source project on GitHub has its own community, complete with its own set of rules and guidelines. Ignoring these can lead to confrontation and the rejection of your offerings.
How to Avoid: Before contributing, always read the project’s community guidelines. Respect the community’s rules and standards.
Remember that when learning something new, everyone makes mistakes. Don’t be discouraged if you make errors on GitHub. Consider them as learning opportunities instead.
Final Thoughts
We discussed the fundamentals of GitHub and how to use it for your coding projects in this article. We now know how to:
- Create a GitHub account and a new repository.
- Use branches and pull requests to make and commit changes to your code.
- Use issues and wikis to collaborate on projects with other developers.
- Explore the GitHub UI and its features.
- Use GitHub to advance your career by exhibiting your work, contributing to open source projects, and developing your own brand.
I hope you find this post to be useful and instructive. GitHub is a fantastic platform for improving your coding abilities, collaborating with others, and developing exceptional software. So, what are you waiting for? Begin your GitHub journey right now and unleash your coding potential!
Now get out there and change the world!
If you want to explore your options, please reach out to our team by via email at support@skratsch.com or by calling 1.313.284.5656
Tags: githubbeginnerdvcs

Editor
Steve is a Software and Cloud Engineer, Content Creator, and Innovation Enthusiast. He is open to collaborating on projects that match his skills, which include .NET Framework/Core, C#, APIs, RESTful Services, SQL Databases, and Azure.